If you manage a high volume of emails or complex workflows, you know the value of automation in maintaining long-term productivity. In fact, 92% of the individuals in a recent survey believe workflow automation significantly boosts their efficiency.
This is why email providers like Gmail have integrated automated features like filters, labels, and the auto-move function to help users save time and streamline email management.
In this guide, we’ll explore the nuances of these automation features and explain how to automatically move emails to a folder in Gmail. We’ll also compare this approach to the modern, AI-driven developments in email management best practices so you can optimize your workflow effectively.
How do folders work in Gmail?
Gmail takes a slightly different approach to organizing emails into designated locations. In the old folder-based system, moving an item into a folder removes it from its original location—you can only find it within the new location. This isn’t the case with Gmail. Rather than “moving” emails, it applies labels, which function like folders but offer more flexibility.
Gmail labels act as tags that you attach to an email, allowing them to appear in multiple places at once. Even if your email is labeled and grouped under a specific view, it can still remain visible in your central inbox or under other labels.
The table below gives a quick overview of the differences:
Gmail labels | Traditional folders |
Tag-based organization system Emails can have multiple labels Labeled emails remain in the inbox and “All Mail” Flexible and non-restrictive structure | Container-based organization system Emails can belong to only one folder Moved emails are removed from the inbox Rigid, single-location structure |
With this in mind, it’s not possible to move emails to a traditional “folder” within Gmail, as the platform doesn’t use folders in the conventional sense. You can only move emails from one label to another.
That said, there are effective workarounds that allow you to create folder-like organization in Gmail using its labeling system.
How to move emails to folders in Gmail
Let’s walk you through how to manually move emails to a “folder” in Gmail before proceeding to the automatic method. The steps are as follows:
Open your Gmail app and navigate to an email
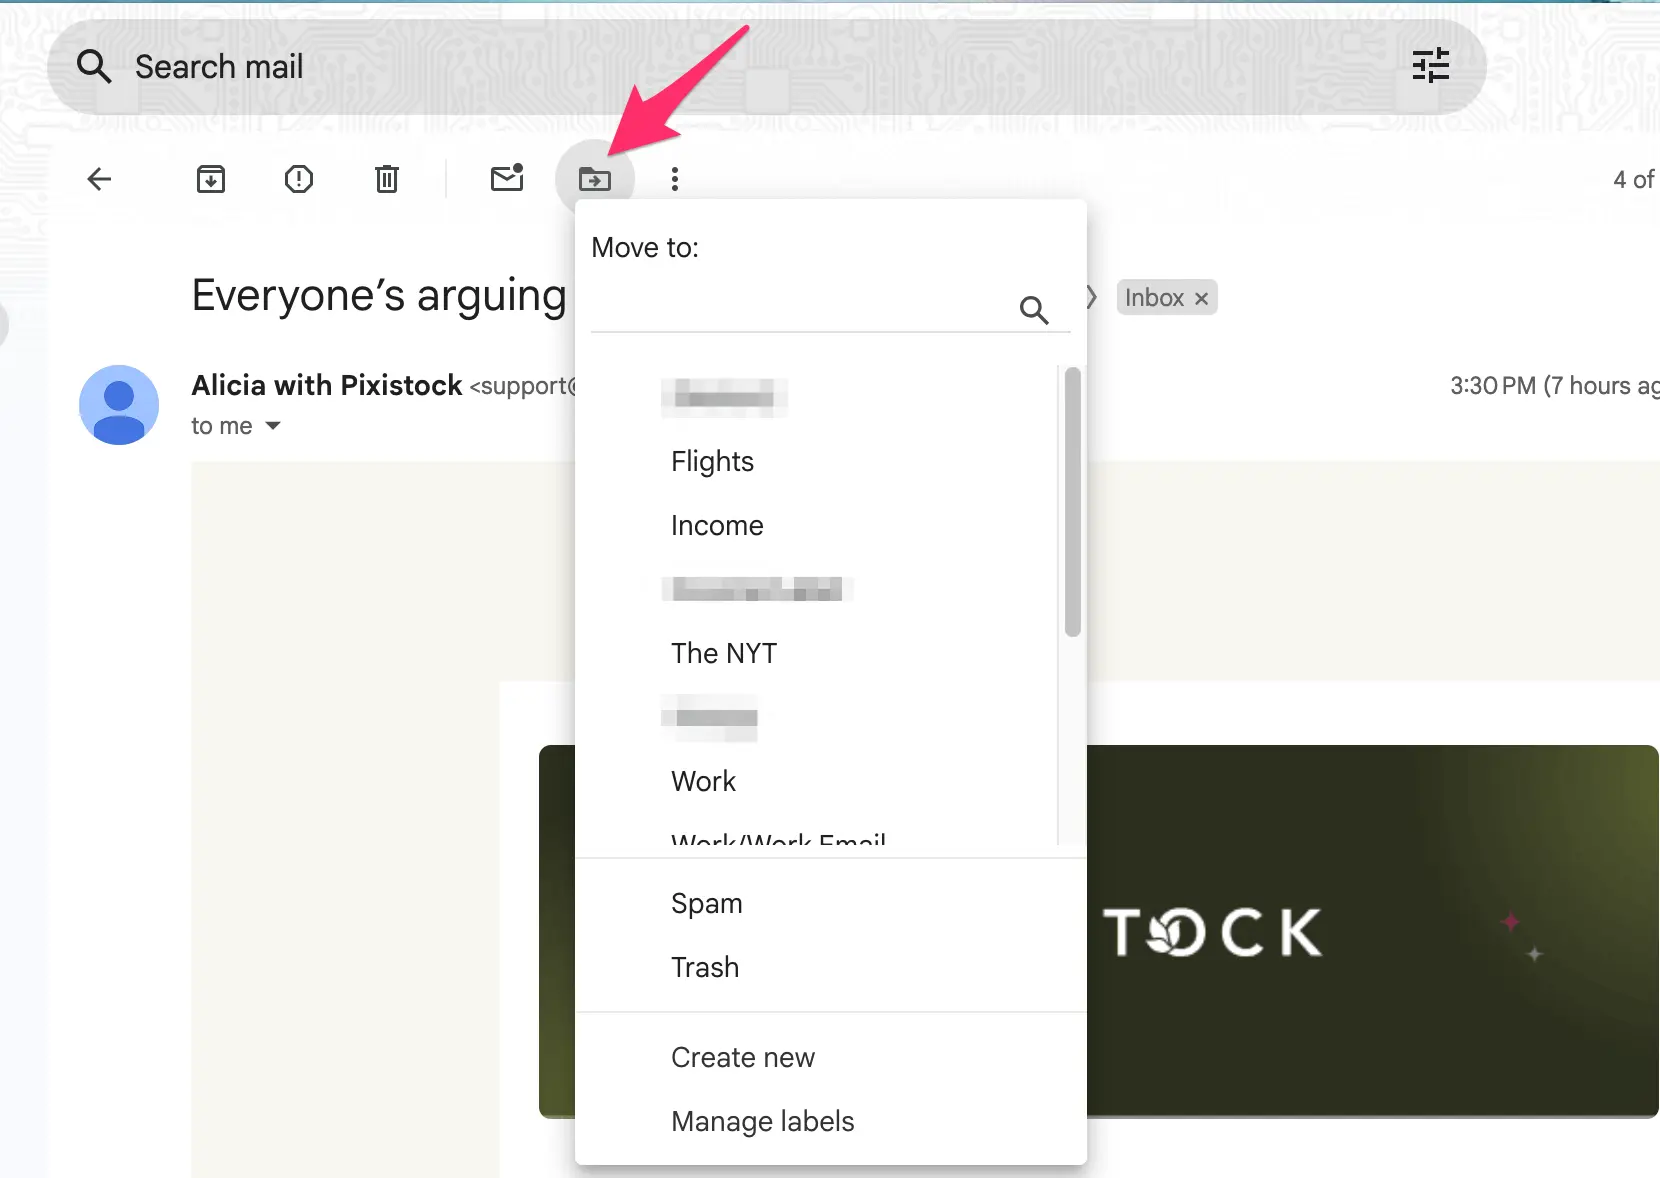
Open the email and navigate to the top of the screen, where you’ll notice a row of icons
Click on the folder icon with a small arrow; this is Gmail's official “move-to” button
Select the new label location from the list or create a new one with the option at the bottom
Choose the new label, and the email will be moved immediately
The problem with this manual method is that it’s inefficient for managing a high volume of emails, whether they’re already in your inbox or incoming.
How to automatically move emails to a folder in Gmail
You can automate Gmail’s move-to feature by creating filters. Gmail filters are a powerful organizational feature that automatically handles your incoming emails based on criteria that you set. They’re rules that tell Gmail what to do with the emails you set aside.
Here’s how to create a filter that automatically moves your emails into a dedicated label:
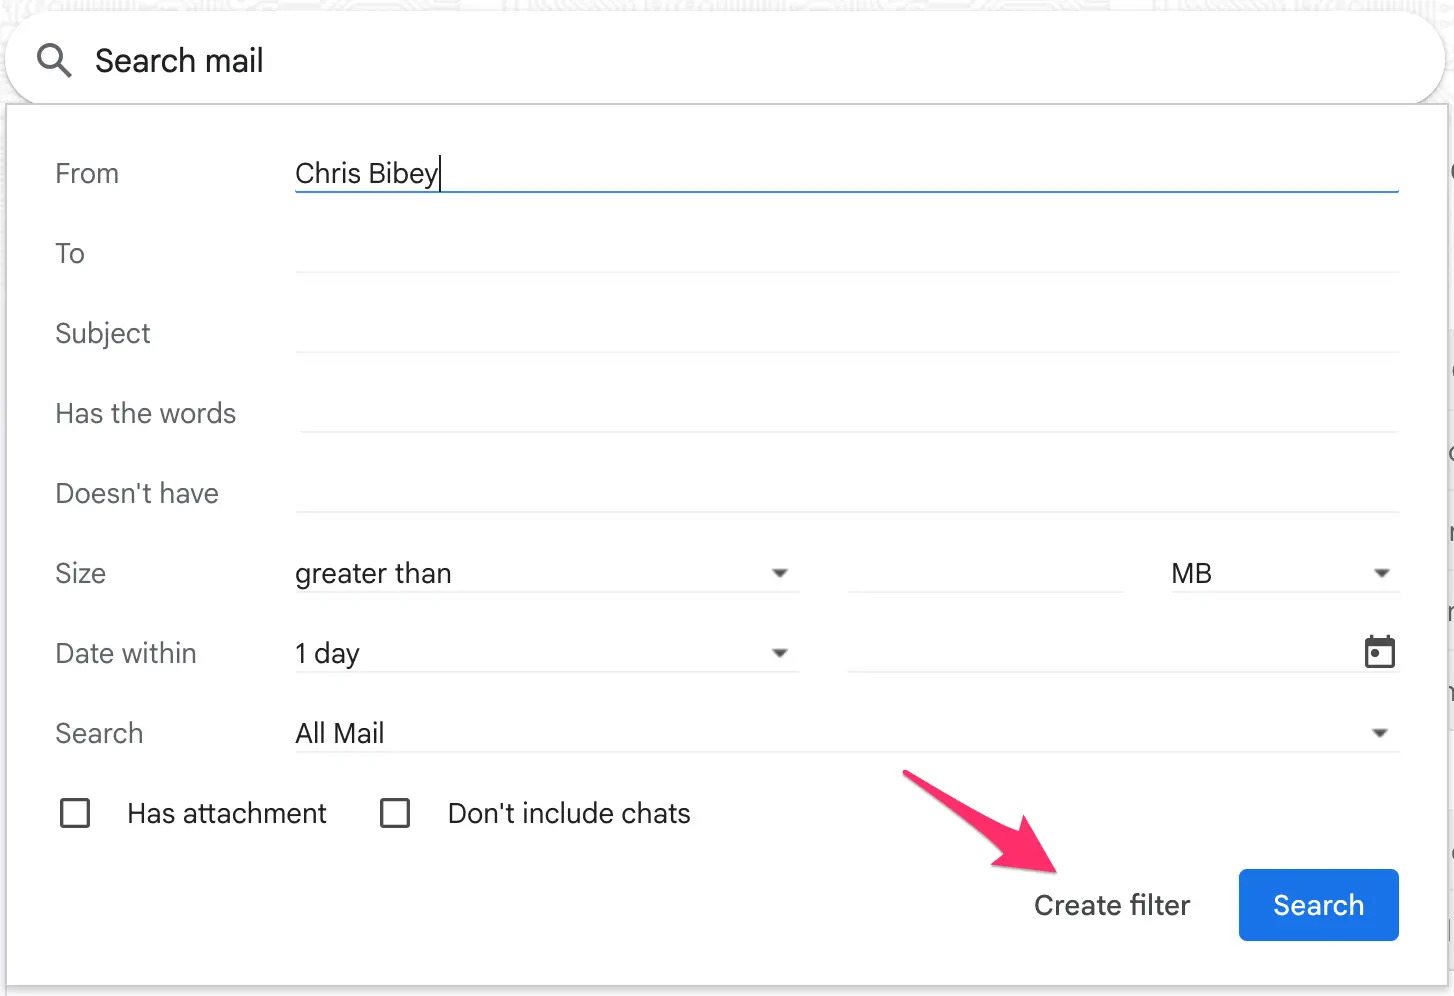
Step 1: Open Gmail and navigate to the triple-slider icon in the search bar

Step 2: Click on the icon and filter out the emails you want to move to a label. You can filter emails based on the subject, sender, recipient, keywords, etc.
Step 3: Once you’ve typed your preferred search criteria, hit the search button
Step 4: Go through the list of emails that appear and verify that those are the emails you wish to move
Step 5: If you’re satisfied with your results, hit the three-slider icon again and click Create filter

Step 6: On the new page that appears, select the Skip the inbox option and then Apply the label of your choice (new email location)
Step 7: To ensure all existing emails with the same criteria also appear in your “folder,” navigate to the bottom of the list and click Also apply filter to matching conversations
Step 8: Click Create filter to complete the process
All existing and incoming emails matching your criteria will automatically move from your inbox into the new label location, creating a makeshift folder for your needs.
A simple way to move emails out of the primary Gmail inbox
If you have created a Gmail filter but forgot to use the “Also apply filter to matching conversations” criteria, some matching emails may still be within your primary inbox. To completely move the email out of your inbox, such that it’s only found in the new label location, take these steps:

Open the email you want to organize
Navigate to the top where the attached labels are displayed
Click on the X icon beside the Inbox label to remove the email from the primary folder
Now, the email will only appear within the other label applied to it.
What if you accidentally remove all labels from an email? Luckily, all emails that are not in your primary inbox are collected in the archive, the All Mail folder, where you can run a search to find the email you need.
How to move all emails from a sender to a folder in Gmail
If you want to move emails from a specific sender into a designated label, you’ll need to create a new filter. Here’s how:
Open Gmail and click on the triple-slider icon in the search bar
Type in the name or email address of the sender in the From field
Add other criteria, such as keywords, in the relevant fields if you want to be more specific
Click Create filter to set up your filter
Click Skip the inbox and then apply your preferred label
Remember to apply the filter to your already existing emails
Finish the setup process by clicking Create filter
This setup will move existing and incoming emails from the defined sender into the dedicated label.
Does Gmail's auto-move setup actually work?
Gmail’s auto-move feature improves the process of manually sorting emails, which is especially beneficial when dealing with a lot of emails. It enhances your efficiency by automating the process and, to some extent, reduces the manual input required to maintain a clean inbox.
It can help you prioritize important emails based on your rules and reduce the effort of manually searching for an email in a cluttered inbox.
Other benefits of Gmail’s auto-move feature include:
Time-saving with smarter organization: With a well-labeled inbox, you can quickly identify crucial emails and skip the manual, near-endless scrolling.
Workflow-friendly customization: With the move-to function, you can create an email routine that reflects your workflow and priorities. To help you better identify these labels, you can use Gmail’s label colors to distinguish each and improve visual organization. You can also use Gmail’s handy multi-label feature and apply multiple tags and identify different categories at once.
Enhanced focus and productivity: The auto-move feature makes it faster to complete your tasks since you’re not stuck sorting your emails or cleaning up your inbox.
Drawbacks to using Gmail filters to auto-move emails
While Gmail filters are a valuable tool for automating email management, they also present some limitations that hinder efficient inbox organization. Examples include:
Misclassification of emails: Filters, though designed to help, can sometimes be too aggressive, leading to important emails being mislabeled or moved. This can result in missed deadlines and opportunities.
Potential for data loss: When filters misclassify emails, the consequences can be dire. Aside from missed deadlines, you could lose essential information if Gmail mistakenly auto-deletes the emails because they were wrongly filtered.
Limited adaptability: Gmail’s filtering can struggle to recognize patterns or learn from user behaviors. For example, it may not automatically group emails with similar subject lines from the same sender if there are slight variations in the wording. This will require you to build increasingly complex and specific rules to manage your emails.
Ongoing maintenance: Gmail’s filters and labels generally need significant manual setup and continued maintenance to ensure accuracy as your needs evolve.
Switching to a productivity-first inbox management solution may be a better approach to overcoming these challenges and achieving efficient email management organically.
What makes a solid productivity-first inbox management solution?
A modern, productivity-first inbox management tool addresses these limitations that plague traditional email management providers. It prioritizes automation and intelligent organization with AI, empowering you to focus on essential tasks rather than micromanaging your inbox.
If you’re considering switching from Gmail to a more efficient email provider, there are certain productivity features and capabilities you should look out for in the new email service. They include:
Feature | Explanation |
AI-powered automation | Instead of rigid rules and setups, modern solutions use AI to auto-categorize, label, and prioritize your emails. They learn from your emailing behavior to adapt to your needs, reducing the time you spend configuring manually. |
Adaptable workflow views | Many newer email solutions not only sort emails into labels but also create highly customized, smaller inboxes that help you focus on your current tasks without the distractions of other emails. |
Intelligent assistance | Productivity-first email solutions reduce cognitive load and aid faster email triage by leveraging AI to generate replies and draft emails, automate meeting scheduling, and even create smart summaries of long emails. |
Not many email tools focus on ALL of these features, but Notion Mail stands out as one that does.
Notion Mail: Your intelligent inbox assistant
Notion Mail is an AI-native, productivity-first email client that works with your existing Gmail account to provide a more intuitive and efficient way to manage your inbox. It doesn’t just present your emails; it serves as an intelligent assistant that leverages AI to learn your email preferences and automates your tedious manual triaging tasks, such as labeling.
Instead of manually sorting emails, you can use the AI autopilot feature to automatically organize and prioritize messages into specific labels using simple prompts. For example, you can instruct Notion Mail to “Label all emails from my editor [sender name] as ‘Urgent.’
The AI takes over the labeling procedure and ensures that the emails matching the criteria are correctly routed to the correct label—without extensive manual configurations.
Notion Mail also offers customizable views, letting you create focused inboxes relevant to your specific workflows and projects. For example, you can build a specific inbox view for “Client onboarding” and use AI Autopilot to filter emails and scheduled meetings into the mini inbox.
Beyond this AI-driven organization, Notion Mail also offers more tools for a streamlined email experience, including:
AI email composition with smart reply suggestions and email generation
Automated scheduling with the convenient /schedule command
Email summarization and automated follow-up reminders
Sign up for Notion Mail
Notion Mail is designed exclusively for use with Gmail, which means you need a Gmail or Google account to get started and enjoy a more intelligent AI-powered experience.
The email client is available on iOS, Android, and Windows and offers many of its automation features for free. If you need more enhanced AI-powered functions, get the Notion AI add-on.
Bonus read: Want to improve your Gmail experience? Check out our other detailed troubleshooting and inbox management guides:
