According to a Statista survey, around 361 billion emails were sent and received every day worldwide, and it’s estimated that number will only grow. With individual users receiving dozens to hundreds of emails weekly, it’s no wonder that recalling specific details from an email can become a scavenger hunt you never signed up for.
One effective way to make your search easier is by sorting your inbox using criteria like sender. Taking it a step further, you can organize emails into designated locations based on the sender further, which significantly cuts down search time.
If you’re tired of spending hours combing through your inbox, this guide can help. It walks you through:
How to organize Gmail by sender and other useful filters
How to automate the process for a more efficient inbox
How to sort and organize Gmail inbox by sender on desktop
Gmail offers a variety of tools and methods to simplify the search process, no matter what criteria you’re using. If you remember who sent the email you’re looking for, you can use the sort by sender option to quickly locate all messages from that user.
Sorting emails this way is also a great first step toward organizing your inbox for quicker access. Before jumping into categorizing emails, try any of these three methods to sort them by sender on a desktop:
Use the “Find emails from” option
Sort with the search bar
Use the Advanced search method
1. Use the “Find emails from” option
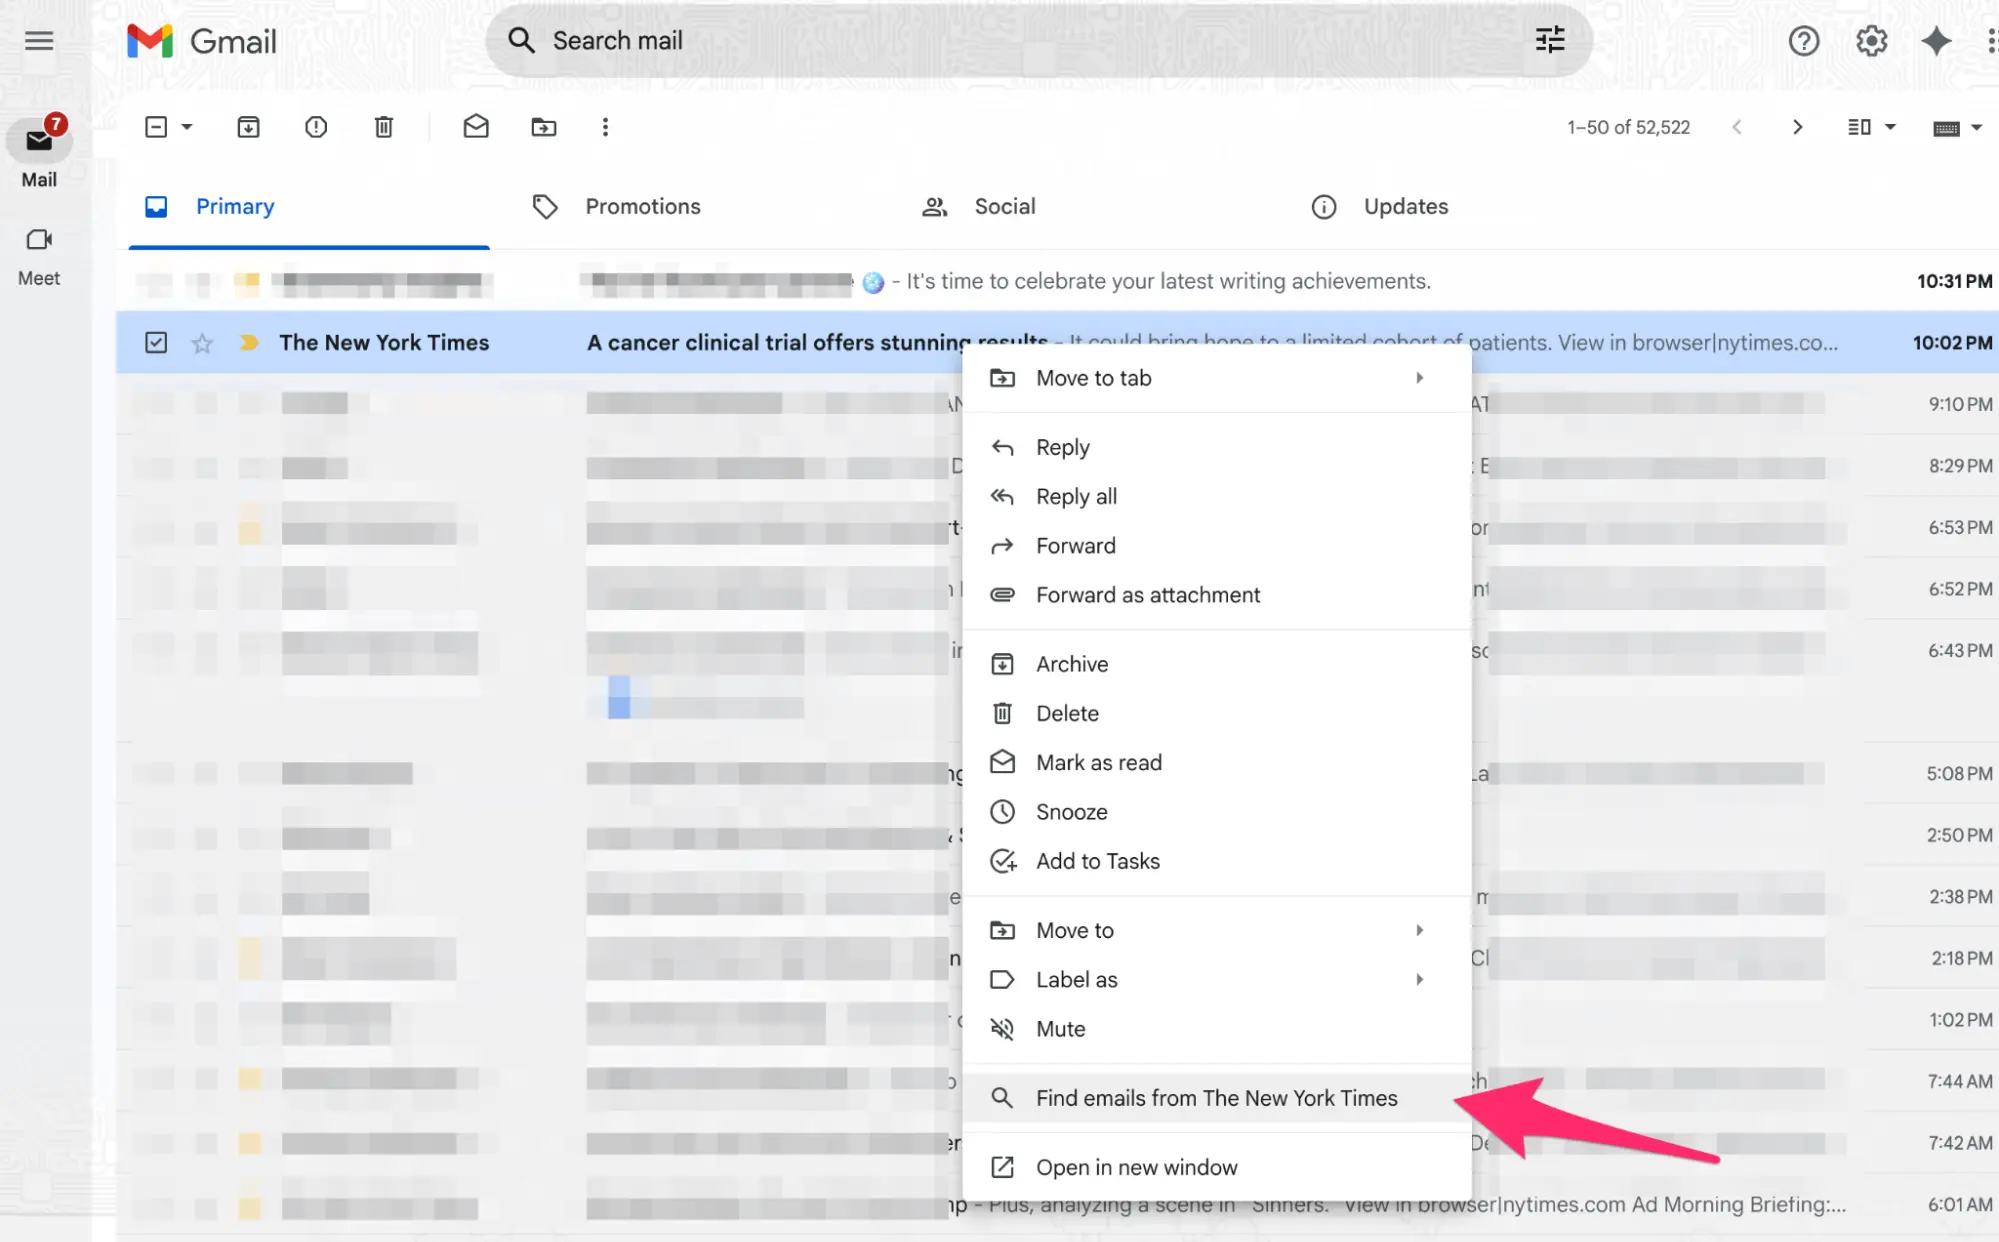
The fastest way to find emails from a specific sender—if you’re already viewing one of their messages—is to right-click on the email and select “Find emails from [sender]” in the list that drops down.
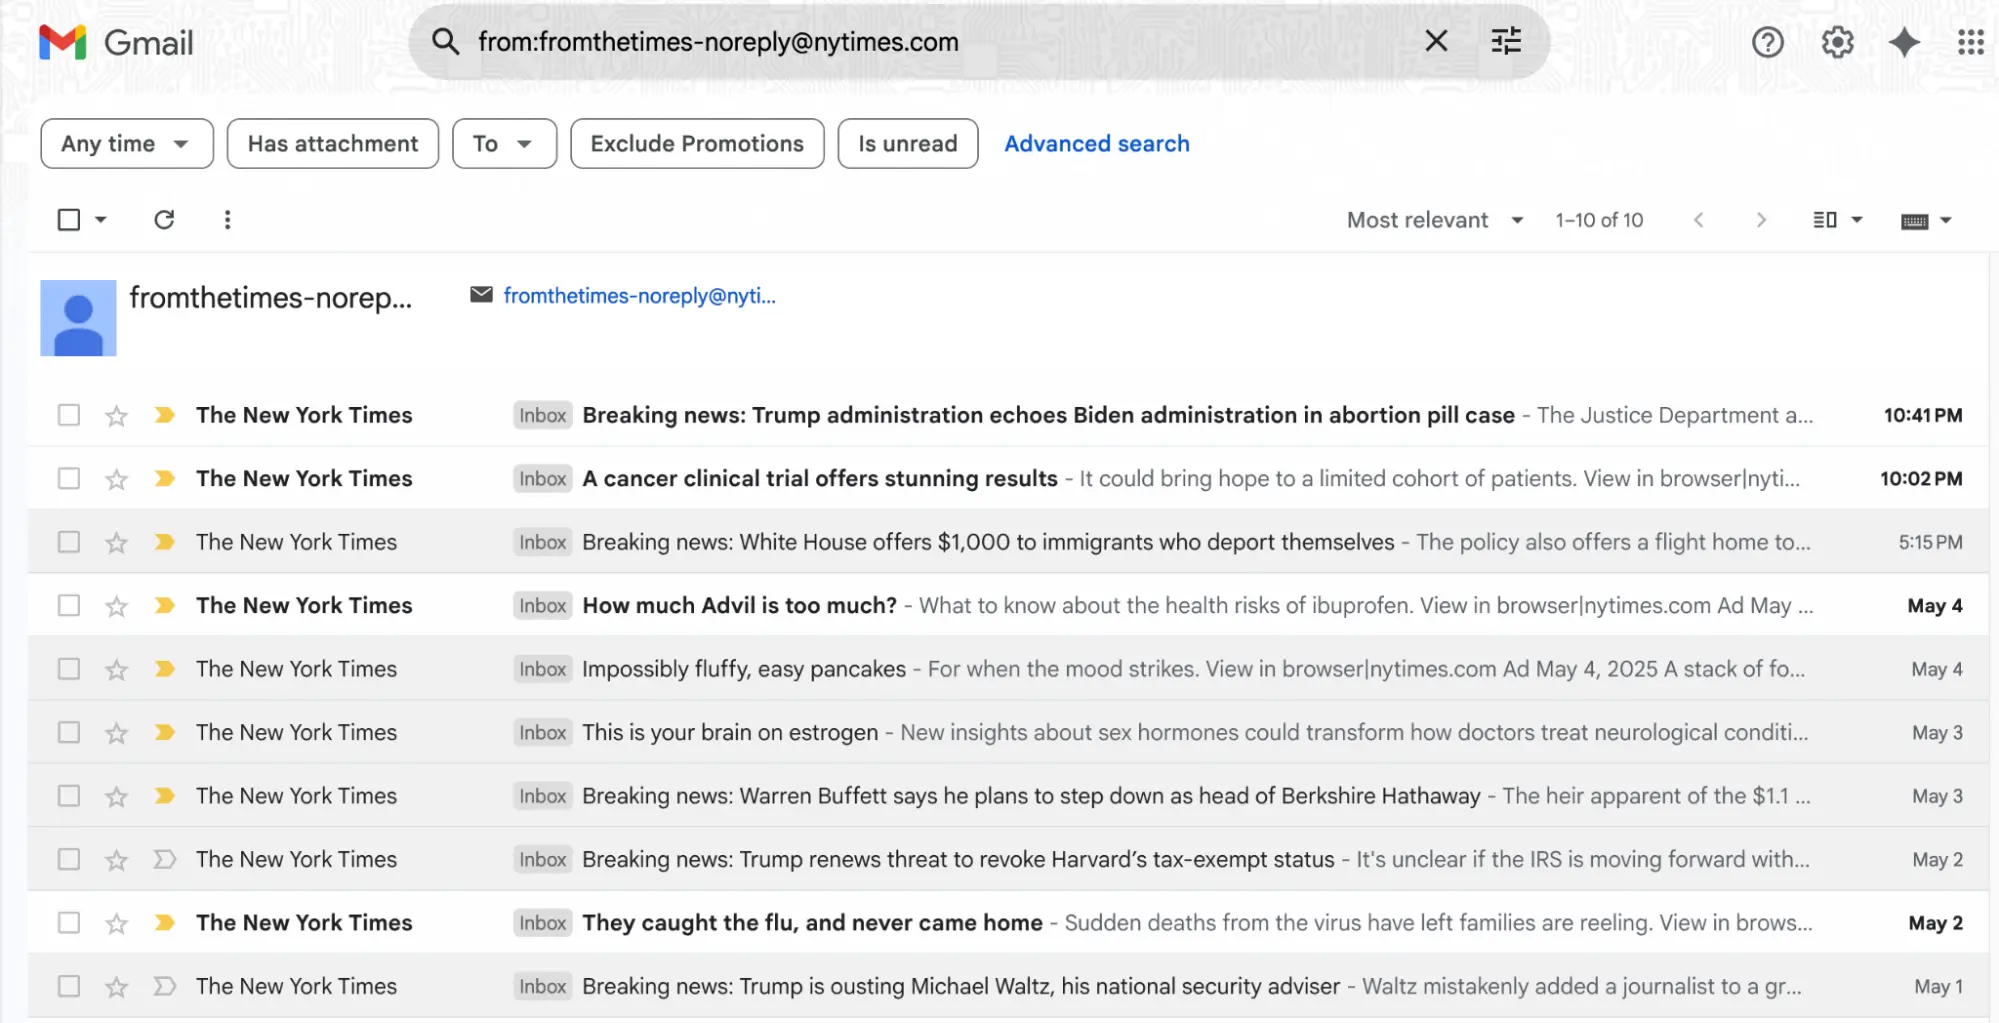
A new list will display all the available messages from this sender, no matter the location in your inbox. The list should look like this:
2. Sort with the search bar
Gmail’s search bar is another versatile tool for quickly sorting by sender. It works well if you know the full email address or the user’s name. For instance, using our example from the screenshot above, a search for “New York Times” or “[email protected]” will reveal emails from that account.
Here’s how it works:
Type the sender’s email address in the search bar, then press Enter
If you don’t know the email address, enter the sender’s name
You’ll get a list of results matching the search query you made
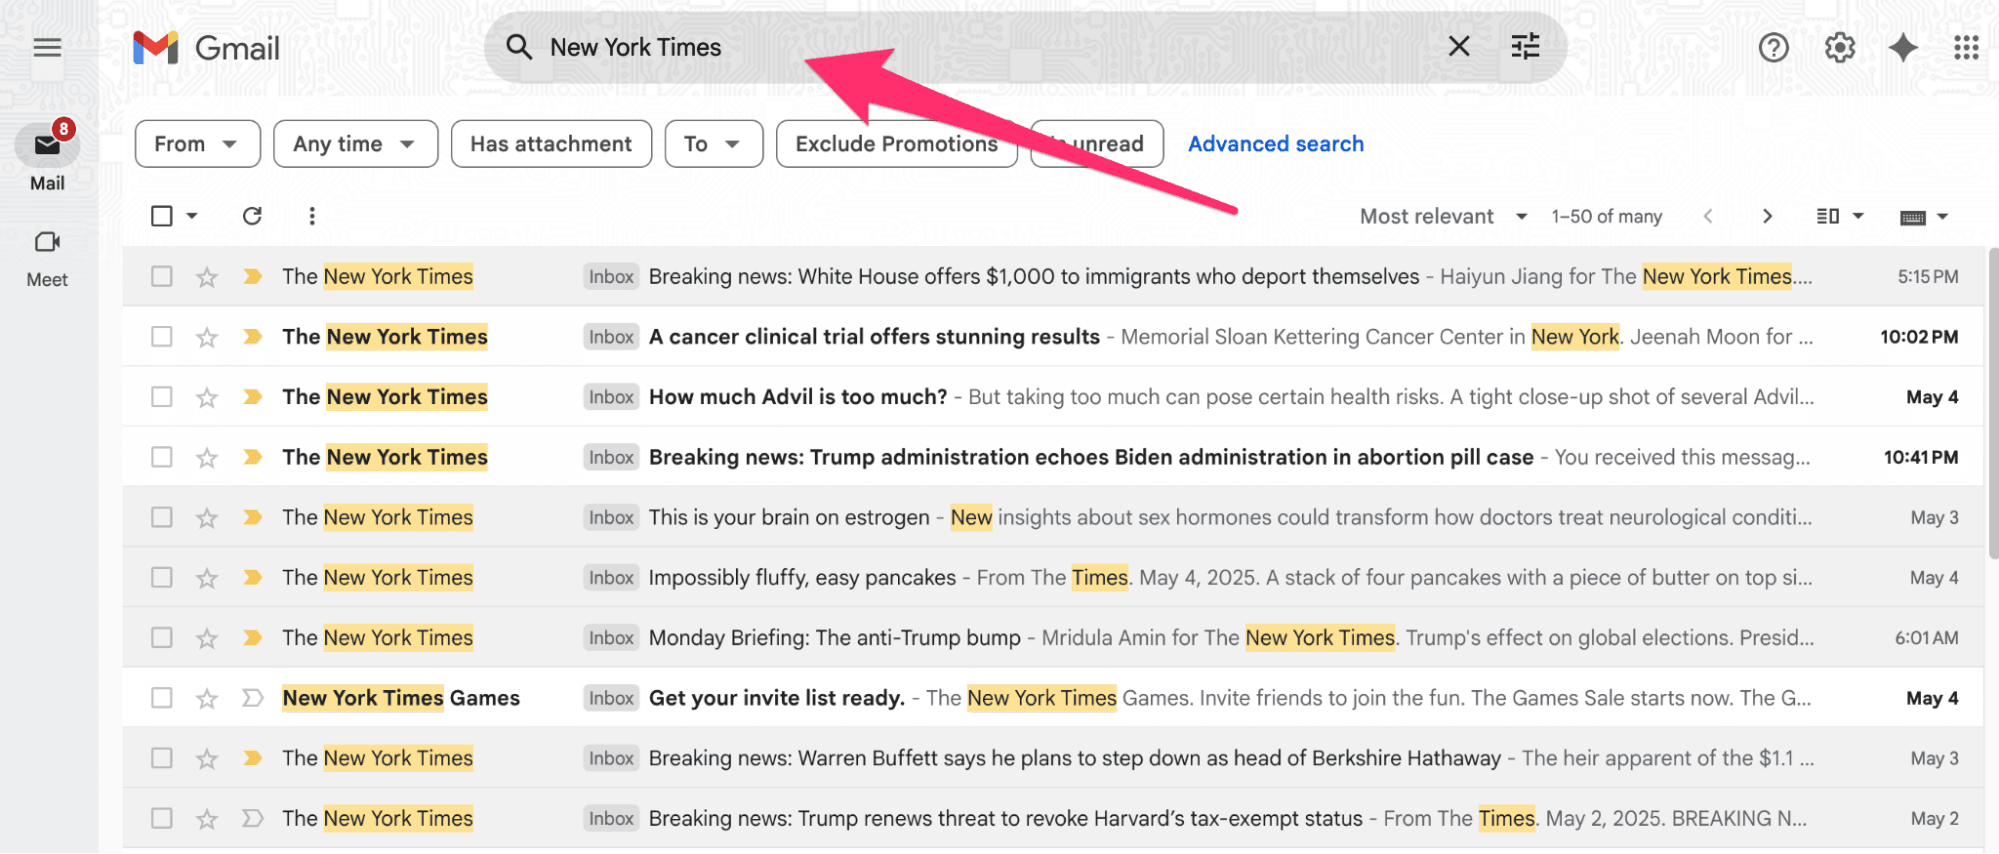
Gmail's search bar is pretty advanced and can even suggest the sender you may be searching for based on your input in real time.
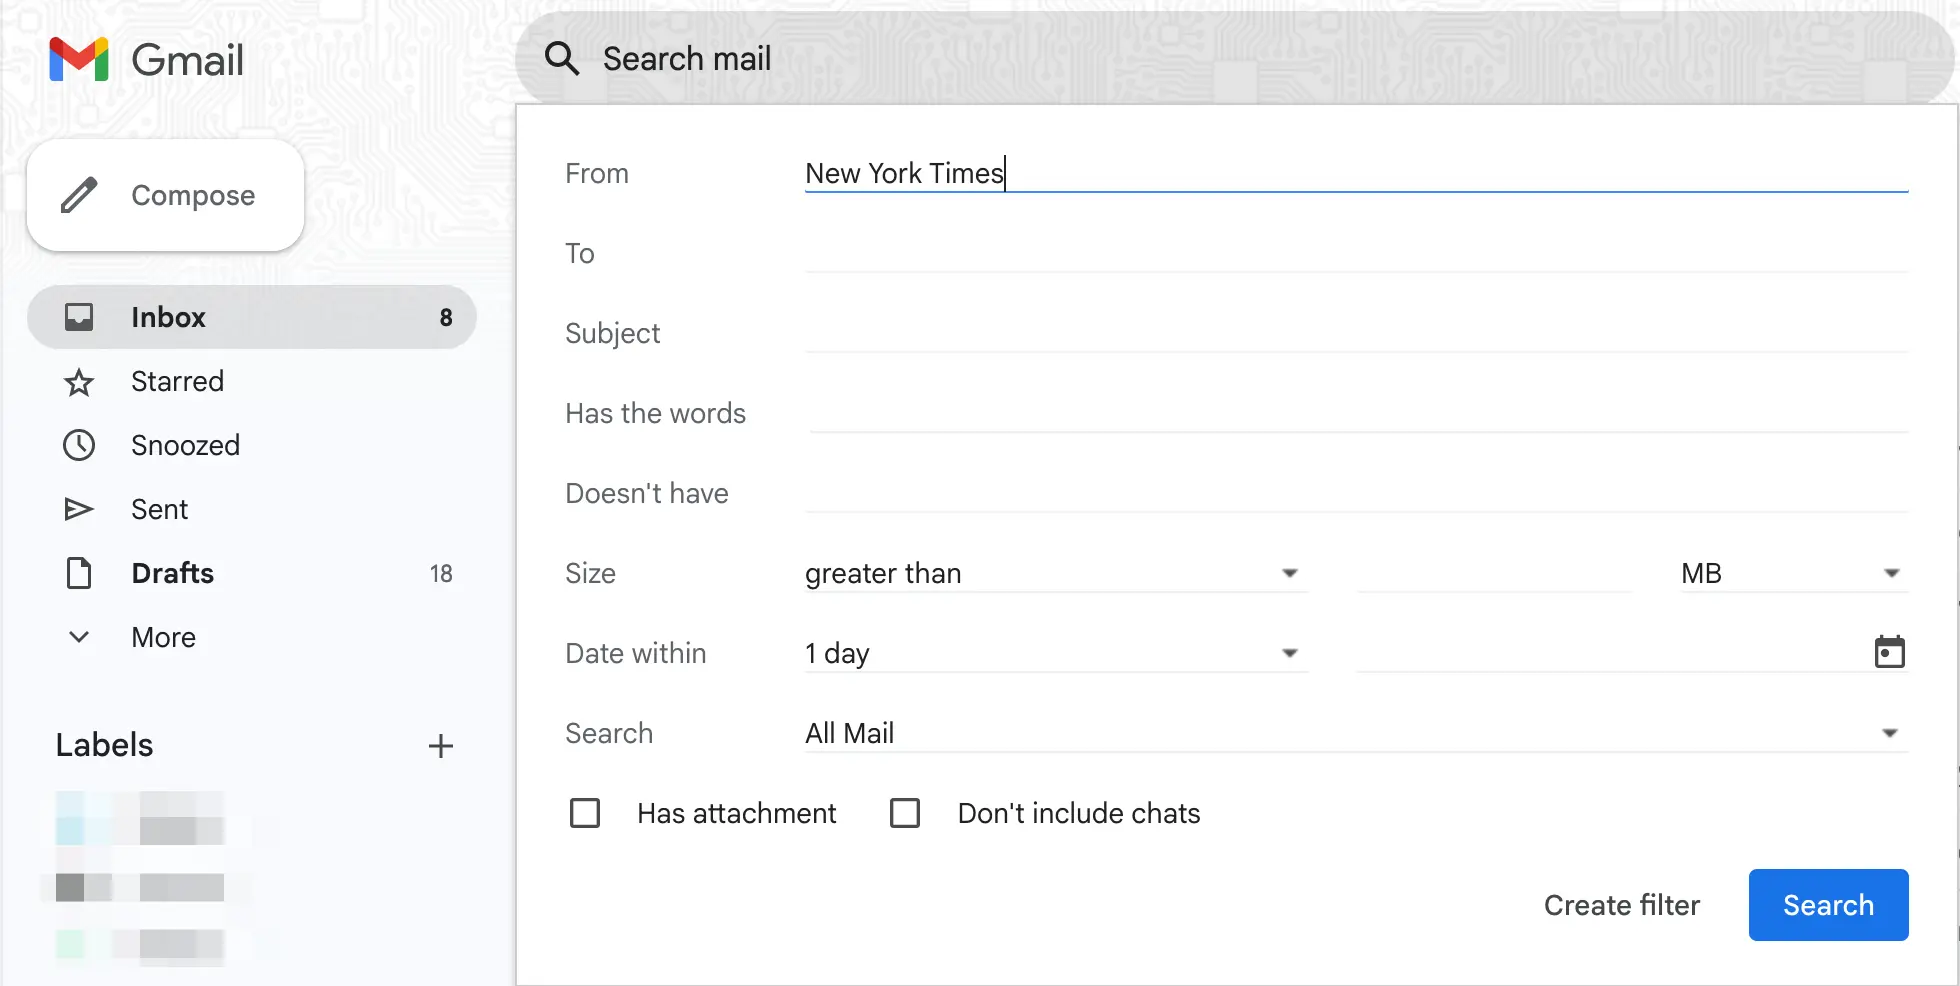
3. Use the Advanced search method
The Advanced search method is most effective if you’re looking for more refined search results to eliminate mismatched emails from filtering into your list. It allows you to filter messages by sender, date range, or keywords for better precision.

Here’s how to do it:
Click on the three-sliders icon in the search bar to view more search options
Type the sender’s email or name in the From field
If you remember other information, such as the date the email was sent or a keyword in the email, type it in the provided fields
Click the search button, and Gmail will provide a list of messages matching your search criteria
The advanced search panel looks like this:
Use this method if you’re sorting through an extensive list of emails from a particular sender.
How to categorize emails in Gmail by sender
While Gmail doesn’t offer traditional email folders, Gmail’s labels function similarly by grouping emails with the same tag in one place. To automatically organize emails from a particular sender, you need to set up a filter rule.
This automated rule applies a chosen label to all existing emails that meet the criteria (the sender) and automatically labels your incoming emails that match the criteria. It eliminates the need for manual inbox sorting, as all emails from that sender will be in one designated label once the rule is set.
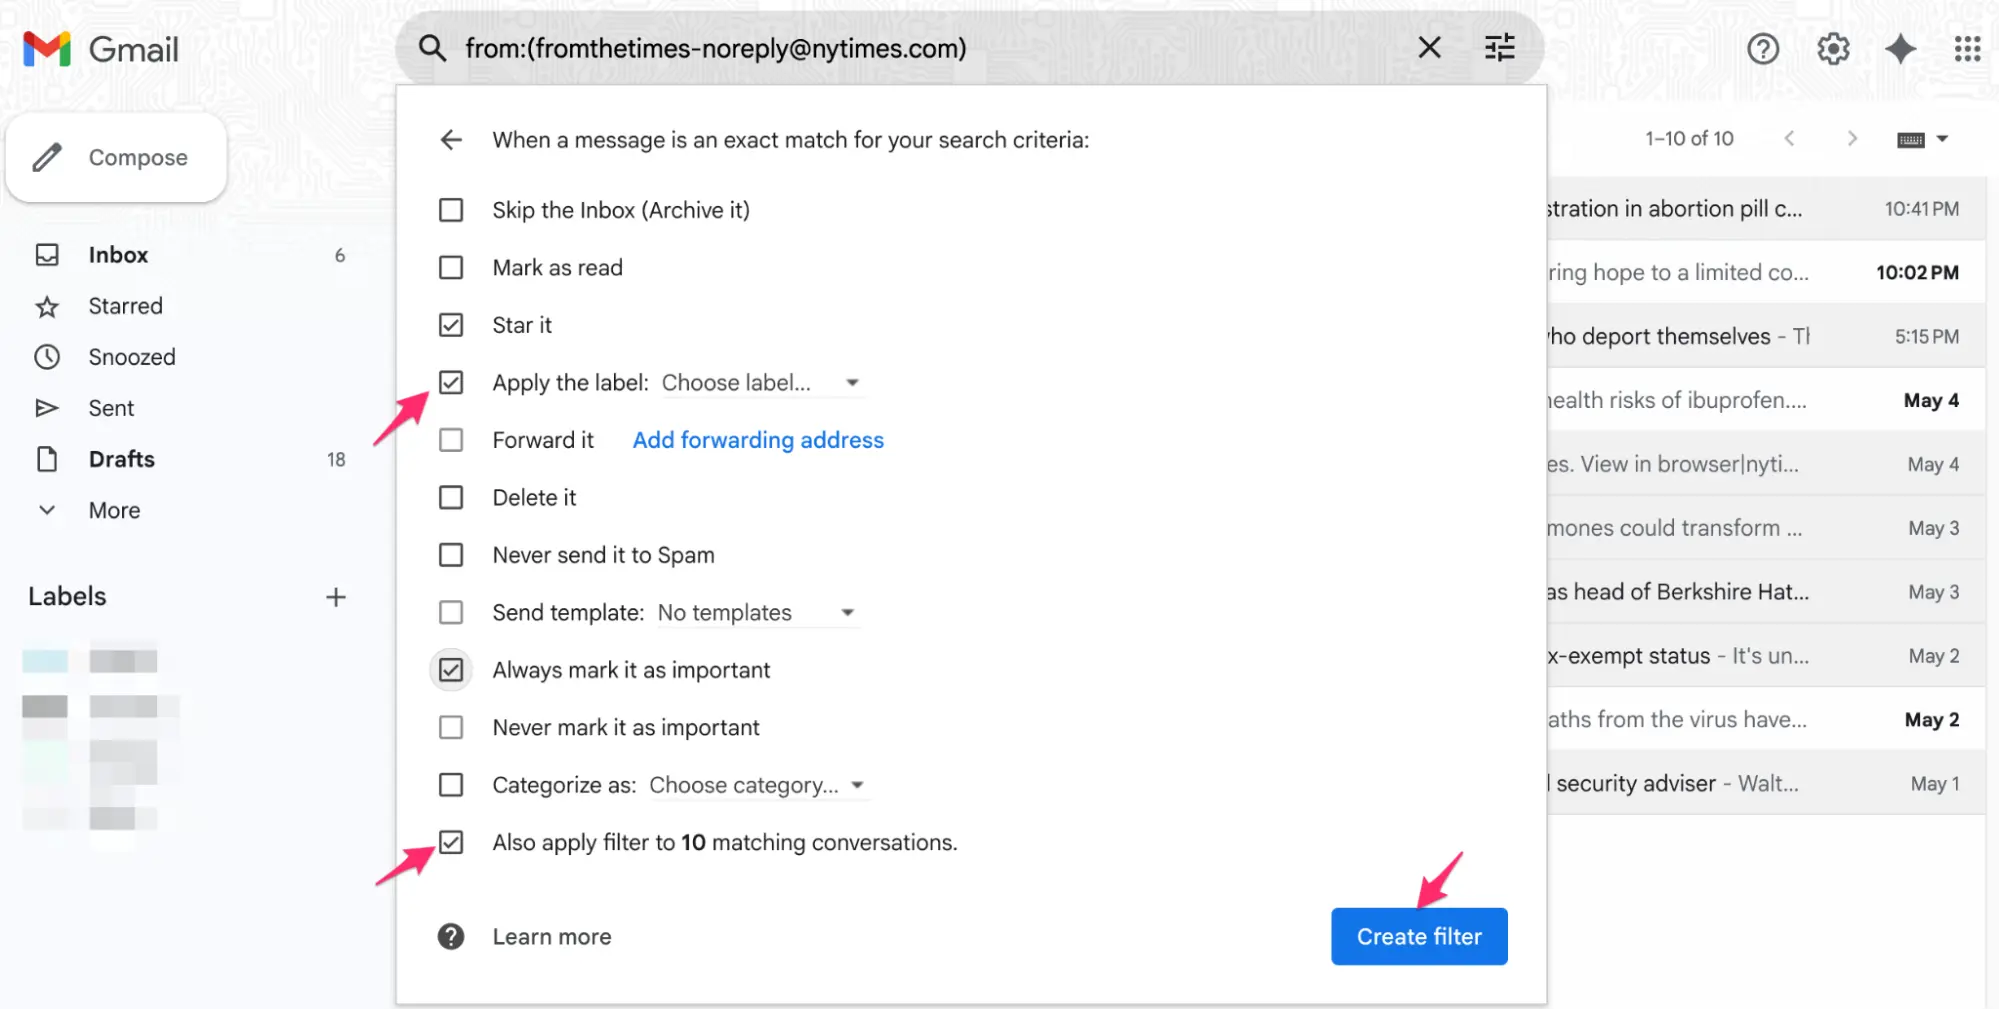
Here’s how to create a Gmail filter rule for a specific sender:
Click on the three-sliders icon in the search bar
Enter the sender’s name or email address in the “From” field
Click on the Create filter text at the bottom of the options
Choose your desired action for organizing the emails. For instance, you can:
Forward it
Star it
Mark as read
Always mark it as important
Name the filter by clicking Choose label on the checklist
Click the check box beside Apply the label and select the new label name from the drop-down list
Mark the last item on the checklist to apply your filter to existing emails that match the criteria
Once you’re satisfied with your rule, click the Create filter button to set it
All emails from this sender will now be in the left sidebar under the Labels section.
How to organize emails in Gmail by sender on mobile
If you prefer to use Gmail on your mobile phone, you can manually sort your emails using the Gmail mobile app. However, once you have sorted the emails, you cannot organize them with filter rules via mobile.
If you’re simply looking for a specific email from a sender without filtering it into a label, use these steps for both Android and iOS devices:
Open the Gmail app on your mobile device
Type “from:” in the search bar
Enter the sender’s name or email address to emails from that account
You can use the other basic search functions below the search bar, such as dates or keywords, to narrow down results further.
More useful ways to sort and organize your Gmail inbox
Aside from sorting by sender, there are many other ways to organize your Gmail to find emails faster. They include sorting:
By date
By subject
By unread
Chronologically
How to sort Gmail by date
If you’re looking for an email that entered your inbox within a specific timeframe, you can narrow search results to only display emails within that period. It’s an efficient way to sort your inbox if you remember an email associated with an important day but not the exact content of the email.
Here’s how you can do it:
Click the three-slider icon in the search bar to reveal the advanced search panel
Locate the field that says Date within
Click the down arrow button to choose the time window you want to search
Select the date range you’re searching for in the field with the calendar icon
Click the search button
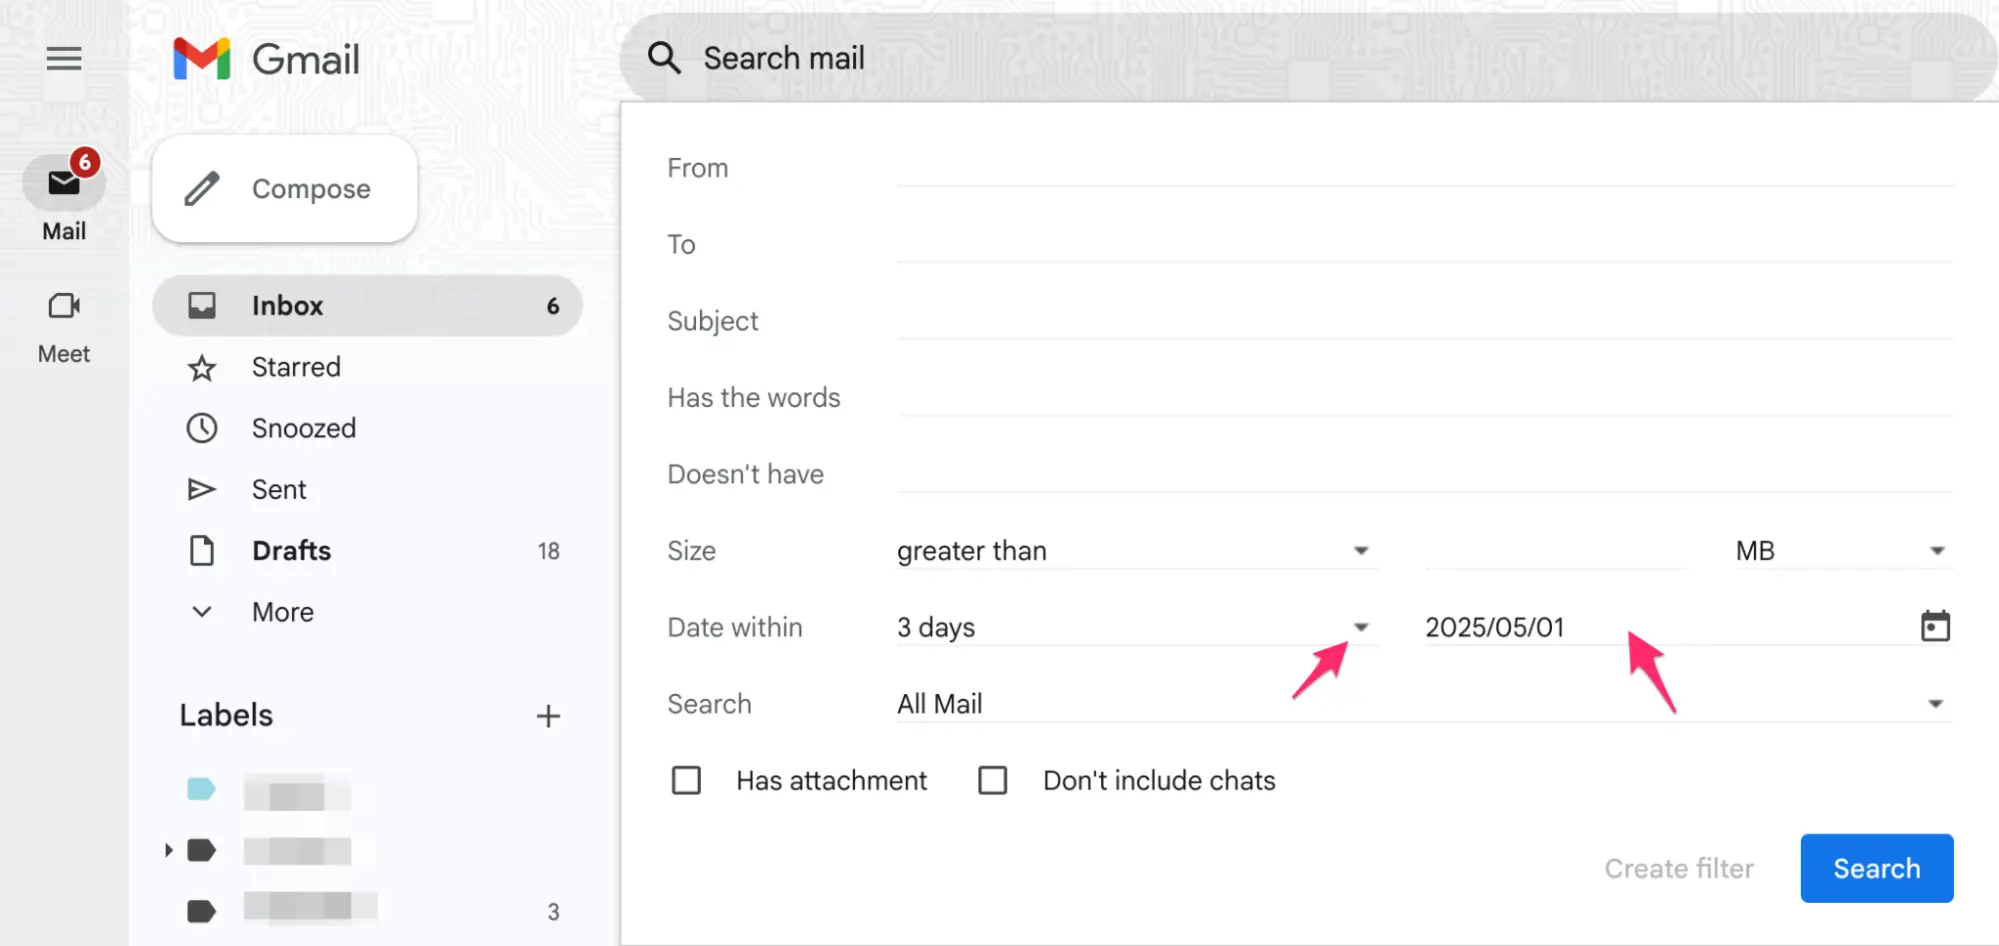
Gmail will display a list of results with emails from before and after your specified date, so even if you miss the exact date, you have a narrower list of emails to browse. If you remember any other details, add a keyword in the “Has the words” field or a sender name in the “From” field to improve the results.
How to sort Gmail by subject
If you remember the subject keywords of the email you’re looking, you can use that to sort your emails. Here’s what to do:
Click on the three-slider icon in the search bar
Type the subject or keywords you remember in the Subject field and hit the search button
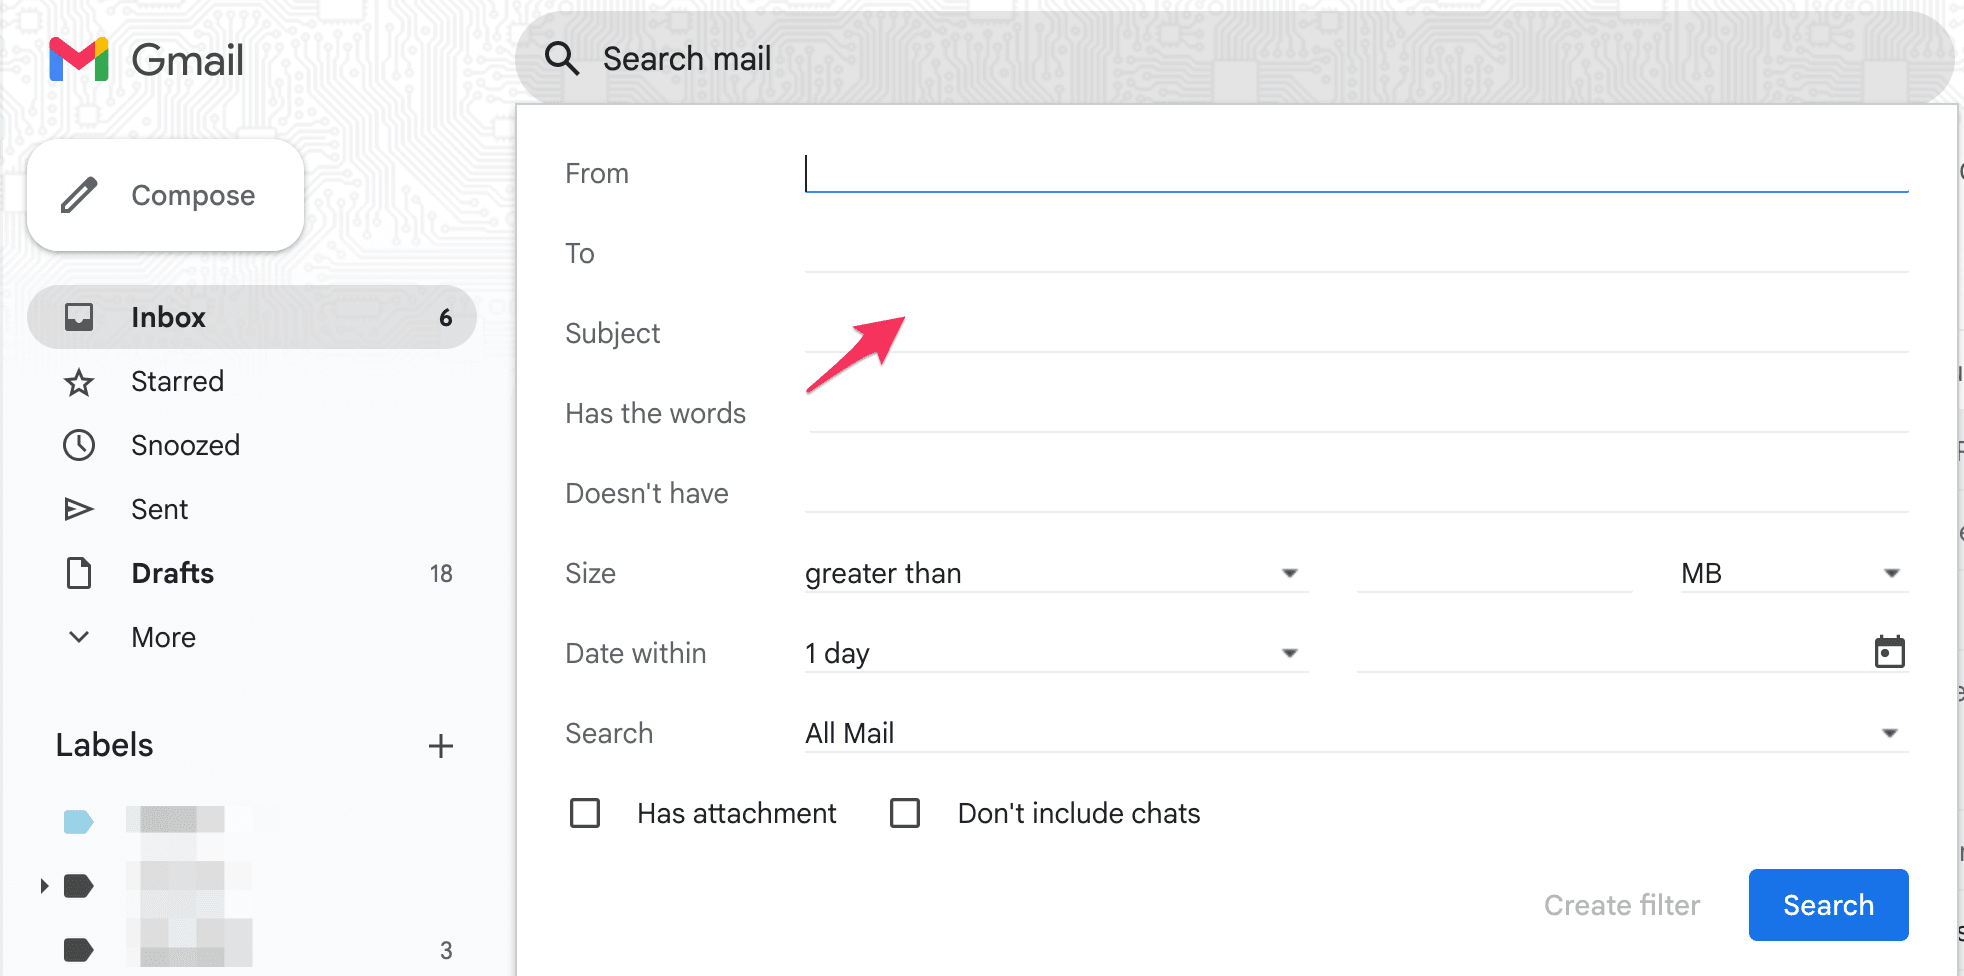
If you want to apply a label to all emails containing the same subject keyword, click Create filter instead. On the next page, select Apply the label, then choose the preferred label you want to tag the emails with.
How to sort Gmail by unread

This is pretty straightforward. In the search bar, type “is:unread” and hit enter. All your unread emails will be displayed in a list. It’s important not to add space between the words in your entry, or the query will not work.
How to sort Gmail chronologically
You can sort your Gmail inbox from oldest to newest and vice versa. The default setting in Gmail is to sort your emails with the newest emails at the top of your inbox, and this order works for most users. However, it could be possible that you have your email set to show the oldest first.
If this is the case, here’s how to revert the setting to default:
At the top-right corner of your inbox, below the search bar, look for the number “1–50 of …”
Click on it and choose Newest from the drop-down menu
You can also just click the Inbox tab on the left sidebar of the Gmail home screen, and the email order will refresh

To sort Gmail from oldest first, click the same number tab “1–50 of …” and choose Oldest.
Reclaim your time with a smarter email experience
Manually sorting and organizing your email, even with basic filters, can be time-consuming and cumbersome. Traditional filters, like the one Gmail offers, require constant upkeep to ensure they’re accurately sorting your emails. Inevitably, some messages still slip through the cracks, so you’ll need to review your spam and primary inbox frequently to find such emails.
Processes like this become particularly challenging when dealing with high email volumes—the effort to maintain order in your inbox can start to feel more demanding than necessary. Gmail’s built-in filters, while functional, sometimes fall short in providing the level of control and modern automation many power users need.
Some users have noted that the default filter categories are basic, making it challenging to create the precise, custom filters needed for workflow management. Others have also mentioned that the filters sometimes misclassify crucial emails as spam and filter them out, which could be a problem in time-sensitive situations.
If you’re tired of the continual oversight and limitations of manual inbox organization, Notion Mail offers a smarter way to manage your email. It’s an email service that leverages the latest AI tech to auto-categorize messages and create tailored filters that keep you ten steps ahead.
Notion Mail: Advanced automation for inbox organization
Notion Mail is an AI-native email client that enhances your Gmail experience with intelligent automation. Whether you’re a productivity enthusiast who desires smart functionality for your inbox or a professional managing a high email volume, the tool learns and matches your need for organization with groundbreaking functionalities.
For AI-automated email organization, these core Notion Mail features offer effortless control:
Feature | How it works |
AI autopilot | The autopilot automates email organization using simple prompts instead of complex filter rules. With brief instructions like Label all client emails “Priority,” the AI automatically sorts your incoming messages into the designated label. |
Customizable views | This feature allows you to create tailored “inboxes within an inbox,” filtering and sorting emails based on sender, labels, read status, and more. The sorting works for you, not the other way around. |
In addition to these core AI-powered features, Notion Mail also offers:
AI assistance for drafting and generating responses to emails
Automated scheduling and follow-up emails
Email summaries
Keyboard shortcuts for common actions
Productivity features such as slash commands and emojis
Notion Mail is a Gmail-exclusive client, so you can use any Gmail or Google account to sign up. This makes it great for Gmail users seeking a more efficient and organized inbox as you can retain your existing email address and still enjoy advanced AI automation when you sign up.
Get started with Notion Mail
Creating a Notion Mail account couldn’t be simpler—all you need to do is connect your Gmail or Google account, and you’re all set. Your new account comes with many useful AI automation features for free, but if you need to expand your automation options, you can purchase the Notion AI add-on.
Bonus read: Check out our handy guides and tutorials for better email management:
